/etc/init.d/eeepc-restore
I disabled this line
$EEEPC_PATH/eeepc-wifi-toggle.sh poweroff || true
http://forum.eeeuser.com/viewtopic.php?id=74280
Showing posts with label eeepc. Show all posts
Showing posts with label eeepc. Show all posts
Saturday, January 22, 2011

Friday, October 2, 2009
ubuntu eeepc wifi disabled at boot time
found these while i was looking for a fix ...
http://www.ventanazul.com/webzine/articles/fix-wireless-connection-problem-gutsy-gibbon
hopefully a more standard fix / update comes out soon
http://www.ventanazul.com/webzine/articles/fix-wireless-connection-problem-gutsy-gibbon
hopefully a more standard fix / update comes out soon
Wednesday, June 3, 2009
eeebuntu home key
eeepc eeebuntu keyboard shortcuts is under system/control centre/keyboard shortcuts
super L = home = window key
very helpful tip, can't see the ok or cancel buttons in dialog boxes because they are below the screen?
> If you hold down the alt key and drag (double tap on touchpad) (anywhere in) the window up you should be able to see those buttons.
http://www.sizlopedia.com/2008/10/09/install-ubuntu-on-eee-pc/
super L = home = window key
very helpful tip, can't see the ok or cancel buttons in dialog boxes because they are below the screen?
> If you hold down the alt key and drag (double tap on touchpad) (anywhere in) the window up you should be able to see those buttons.
http://www.sizlopedia.com/2008/10/09/install-ubuntu-on-eee-pc/
Sunday, May 17, 2009
eeepc screen brightness
to remember the screen brightness level on every startup
BRIGHTNESS
When the computer gets idle, the screen becomes darker. Unfortunately, when it wakes up, the brightness is restored to 100 %. To suppress this behavior, I went to System > Preferences > Power management and unchecked boxes called "Dim display when Idle", "Reduce backlight brightness" and moved the cursor on the bar called "set display brightness to". This is probably redundant, but this solved my problem.
Do this for both AC and Battery Power. Adjust the brightness level and then check the boxes again if you like.
http://forum.eeebuntu.org/viewtopic.php?f=28&t=2331
BRIGHTNESS
When the computer gets idle, the screen becomes darker. Unfortunately, when it wakes up, the brightness is restored to 100 %. To suppress this behavior, I went to System > Preferences > Power management and unchecked boxes called "Dim display when Idle", "Reduce backlight brightness" and moved the cursor on the bar called "set display brightness to". This is probably redundant, but this solved my problem.
Do this for both AC and Battery Power. Adjust the brightness level and then check the boxes again if you like.
http://forum.eeebuntu.org/viewtopic.php?f=28&t=2331
Saturday, May 16, 2009
eeepc webcam
wxCam website: http://wxcam.sourceforge.net/
wxCam .deb direct link: http://downloads.sourceforge.net/wxcam/wxcam_1.0_i386.deb?modtime=1201617043&big_mirror=0
$ sudo gdebi wxcam_1.0_i386.deb
wxCam .deb direct link: http://downloads.sourceforge.net/wxcam/wxcam_1.0_i386.deb?modtime=1201617043&big_mirror=0
$ sudo gdebi wxcam_1.0_i386.deb
eeepc battery life
https://answers.launchpad.net/netbook-remix/+question/69228
$ sudo apt-get install eee-control eee-applet
$ sudo apt-get install eee-control eee-applet
eeepc sound recording
1. System->Preferences->Sound
Set all auto detect, except
SoundCapture=HDA Intel ALC622 Analog (ALSA)
Device=HDA Intel (Alsa Mixer)
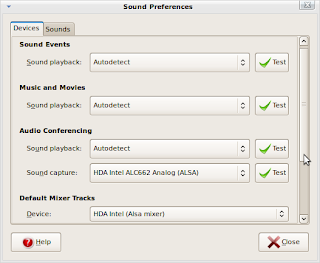
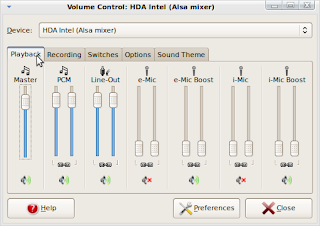
2. Click the Volume Control icon in the task bar
Device=HDA Intel (Alsa Mixer)
Preferences->Check everything
Playback->Disable all e-Mic* (external microphone) and i-Mic* (internal microphone)
Recording->Capture set to 100% and Enable Microphone icon and Speaker icons
Options->i-Mic
.png)
3. Use Sound Recorder for testing
Applications->Sound and Video->Sound Recorder
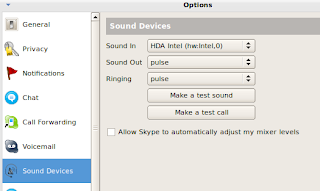
4. For Skype 2.0.0.72
Options->Sound devices
Sound In=HDA Intel (hw:Intel,0)
Sound Out=pulse
Ringing=pulse
(optional) Uncheck Allow Skype to adjust volume
http://forum.eeebuntu.org/viewtopic.php?f=41&t=3655
$ cat /proc/version
Linux version 2.6.29-1-netbook (root@adamm-laptop) (gcc version 4.3.2 (Ubuntu 4.3.2-1ubuntu12) ) #0array1 SMP Mon Feb 23 15:02:03 MST 2009
$ alsamixer
$ lspci | grep Audio
00:1b.0 Audio device: Intel Corporation 82801FB/FBM/FR/FW/FRW (ICH6 Family) High Definition Audio Controller (rev 04)
Set all auto detect, except
SoundCapture=HDA Intel ALC622 Analog (ALSA)
Device=HDA Intel (Alsa Mixer)

2. Click the Volume Control icon in the task bar
Device=HDA Intel (Alsa Mixer)
Preferences->Check everything
Playback->Disable all e-Mic* (external microphone) and i-Mic* (internal microphone)
Recording->Capture set to 100% and Enable Microphone icon and Speaker icons
Options->i-Mic
.png)
3. Use Sound Recorder for testing
Applications->Sound and Video->Sound Recorder
4. For Skype 2.0.0.72
Options->Sound devices
Sound In=HDA Intel (hw:Intel,0)
Sound Out=pulse
Ringing=pulse
(optional) Uncheck Allow Skype to adjust volume

http://forum.eeebuntu.org/viewtopic.php?f=41&t=3655
$ cat /proc/version
Linux version 2.6.29-1-netbook (root@adamm-laptop) (gcc version 4.3.2 (Ubuntu 4.3.2-1ubuntu12) ) #0array1 SMP Mon Feb 23 15:02:03 MST 2009
$ alsamixer
$ lspci | grep Audio
00:1b.0 Audio device: Intel Corporation 82801FB/FBM/FR/FW/FRW (ICH6 Family) High Definition Audio Controller (rev 04)
Friday, May 15, 2009
eeepc webcam
http://forum.eeebuntu.org/viewtopic.php?f=3&t=71&start=15
1)
Enable Webcam in BIOS.
When the EeePC is starting up, before POST you will see the Asus logo and a line telling you to press F2 to enter the BIOS.
Press F2, enter the BIOS settings screen and make sure that the webcam (and everything else you need) is enabled. Then press F10 to save your settings and continue through the boot sequence. You only need do this once, the EeePC will then remember your settings.
2)
Make sure you have the resolution of your webcam set correctly.
You can test this using Cheese, the webcam software that is available via the Add/Remove Software menu option. Use Add/Remove to install Cheese, run Cheese and in the preferences reduce the webcam resolution from 640x480 to 320x240 (or lower). You should get an image in Cheese to confirm your webcam is working. (This may only be a problem for the 701 but it's worth trying anyway.)
1)
Enable Webcam in BIOS.
When the EeePC is starting up, before POST you will see the Asus logo and a line telling you to press F2 to enter the BIOS.
Press F2, enter the BIOS settings screen and make sure that the webcam (and everything else you need) is enabled. Then press F10 to save your settings and continue through the boot sequence. You only need do this once, the EeePC will then remember your settings.
2)
Make sure you have the resolution of your webcam set correctly.
You can test this using Cheese, the webcam software that is available via the Add/Remove Software menu option. Use Add/Remove to install Cheese, run Cheese and in the preferences reduce the webcam resolution from 640x480 to 320x240 (or lower). You should get an image in Cheese to confirm your webcam is working. (This may only be a problem for the 701 but it's worth trying anyway.)
eeebuntu medibuntu
http://forum.eeebuntu.org/viewtopic.php?f=28&p=6542
$ sudo wget http://www.medibuntu.org/sources.list.d/intrepid.list --output-document=/etc/apt/sources.list.d/medibuntu.list
$ sudo apt-get update && sudo apt-get install medibuntu-keyring && sudo apt-get update
$ sudo apt-get install skype-static-oss
(the skype install by itself has problems with audio)
$ sudo wget http://www.medibuntu.org/sources.list.d/intrepid.list --output-document=/etc/apt/sources.list.d/medibuntu.list
$ sudo apt-get update && sudo apt-get install medibuntu-keyring && sudo apt-get update
$ sudo apt-get install skype-static-oss
(the skype install by itself has problems with audio)
Friday, May 8, 2009
eeebuntu on eee-pc broke SD card?
Got these errors after installing eeebuntu on my eeepc-701. After half-a day of research and trying out some digicam SDs, I finally found the fix! And all you need to do is go to the BIOS and set OS Installation to Finished. Voila!
$ dmesg
279.985638] sd 2:0:0:0: [sdb] Add. Sense: Unrecovered read error
[ 279.985706] end_request: I/O error, dev sdb, sector 0
[ 279.995145] sd 2:0:0:0: [sdb] Result: hostbyte=DID_OK driverbyte=DRIVER_SENSE,SUGGEST_OK
[ 279.995219] sd 2:0:0:0: [sdb] Sense Key : Hardware Error [current]
[ 279.995277] sd 2:0:0:0: [sdb] Add. Sense: Unrecovered read error
[ 279.995350] end_request: I/O error, dev sdb, sector 0
[ 279.995493] unable to read partition table
[ 280.148599] sd 2:0:0:0: [sdb] Result: hostbyte=DID_OK driverbyte=DRIVER_SENSE,SUGGEST_OK
[ 280.148696] sd 2:0:0:0: [sdb] Sense Key : Hardware Error [current]
[ 280.148759] sd 2:0:0:0: [sdb] Add. Sense: Unrecovered read error
[ 280.148834] end_request: I/O error, dev sdb, sector 0
[ 280.157893] sd 2:0:0:0: [sdb] Result: hostbyte=DID_OK driverbyte=DRIVER_SENSE,SUGGEST_OK
[ 280.157967] sd 2:0:0:0: [sdb] Sense Key : Hardware Error [current]
[ 280.158029] sd 2:0:0:0: [sdb] Add. Sense: Unrecovered read error
[ 280.158093] end_request: I/O error, dev sdb, sector 8
[ 280.166022] sd 2:0:0:0: [sdb] Result: hostbyte=DID_OK driverbyte=DRIVER_SENSE,SUGGEST_OK
[ 280.166036] sd 2:0:0:0: [sdb] Sense Key : Hardware Error [current]
[ 280.166047] sd 2:0:0:0: [sdb] Add. Sense: Unrecovered read error
[ 280.166058] end_request: I/O error, dev sdb, sector 16
[ 280.173770] sd 2:0:0:0: [sdb] Result: hostbyte=DID_OK driverbyte=DRIVER_SENSE,SUGGEST_OK
[ 280.173786] sd 2:0:0:0: [sdb] Sense Key : Hardware Error [current]
[ 280.173797] sd 2:0:0:0: [sdb] Add. Sense: Unrecovered read error
[ 280.173808] end_request: I/O error, dev sdb, sector 0
Ubuntu-eee, sdhc 16GB, eeepc 4G
$ dmesg
279.985638] sd 2:0:0:0: [sdb] Add. Sense: Unrecovered read error
[ 279.985706] end_request: I/O error, dev sdb, sector 0
[ 279.995145] sd 2:0:0:0: [sdb] Result: hostbyte=DID_OK driverbyte=DRIVER_SENSE,SUGGEST_OK
[ 279.995219] sd 2:0:0:0: [sdb] Sense Key : Hardware Error [current]
[ 279.995277] sd 2:0:0:0: [sdb] Add. Sense: Unrecovered read error
[ 279.995350] end_request: I/O error, dev sdb, sector 0
[ 279.995493] unable to read partition table
[ 280.148599] sd 2:0:0:0: [sdb] Result: hostbyte=DID_OK driverbyte=DRIVER_SENSE,SUGGEST_OK
[ 280.148696] sd 2:0:0:0: [sdb] Sense Key : Hardware Error [current]
[ 280.148759] sd 2:0:0:0: [sdb] Add. Sense: Unrecovered read error
[ 280.148834] end_request: I/O error, dev sdb, sector 0
[ 280.157893] sd 2:0:0:0: [sdb] Result: hostbyte=DID_OK driverbyte=DRIVER_SENSE,SUGGEST_OK
[ 280.157967] sd 2:0:0:0: [sdb] Sense Key : Hardware Error [current]
[ 280.158029] sd 2:0:0:0: [sdb] Add. Sense: Unrecovered read error
[ 280.158093] end_request: I/O error, dev sdb, sector 8
[ 280.166022] sd 2:0:0:0: [sdb] Result: hostbyte=DID_OK driverbyte=DRIVER_SENSE,SUGGEST_OK
[ 280.166036] sd 2:0:0:0: [sdb] Sense Key : Hardware Error [current]
[ 280.166047] sd 2:0:0:0: [sdb] Add. Sense: Unrecovered read error
[ 280.166058] end_request: I/O error, dev sdb, sector 16
[ 280.173770] sd 2:0:0:0: [sdb] Result: hostbyte=DID_OK driverbyte=DRIVER_SENSE,SUGGEST_OK
[ 280.173786] sd 2:0:0:0: [sdb] Sense Key : Hardware Error [current]
[ 280.173797] sd 2:0:0:0: [sdb] Add. Sense: Unrecovered read error
[ 280.173808] end_request: I/O error, dev sdb, sector 0
Ubuntu-eee, sdhc 16GB, eeepc 4G
Thursday, May 7, 2009
easypeasy aka Eee-Ubuntu aka eeebuntu
easypeasy
http://www.geteasypeasy.com/index.php?menu=download
http://sourceforge.net/project/downloading.php?group_id=213463&filename=easypeasy-1.1.iso
eeebuntu
http://www.eeebuntu.org/index.php?page=download
ISO Image to bootable USB disk
http://unetbootin.sourceforge.net/#other
Steps
# Download and choose Save File. Help?
# When it's done, download the helper application (unetbootin) for Windows or Ubuntu / Linux. Help?
# Insert a usb stick (2 GB or more) and run the helper application. Help?
# Insert the usb stick into the netbook and boot from the stick. Help?
# Run Install found under Administration. Help?
# You're running Easy Peasy! Help?
http://www.geteasypeasy.com/index.php?menu=download
http://sourceforge.net/project/downloading.php?group_id=213463&filename=easypeasy-1.1.iso
eeebuntu
http://www.eeebuntu.org/index.php?page=download
ISO Image to bootable USB disk
http://unetbootin.sourceforge.net/#other
Steps
# Download and choose Save File. Help?
# When it's done, download the helper application (unetbootin) for Windows or Ubuntu / Linux. Help?
# Insert a usb stick (2 GB or more) and run the helper application. Help?
# Insert the usb stick into the netbook and boot from the stick. Help?
# Run Install found under Administration. Help?
# You're running Easy Peasy! Help?
Monday, March 23, 2009
eee pc optimizations
1. Circular Scrolling
all you need to do is edit your /etc/X11/xorg.conf file
under "Input Device" of your touchpad edit to look like the following:
Section "InputDevice"
Identifier "Synaptics Touchpad"
Driver "synaptics"
Option "SendCoreEvents" "true"
Option "Device" "/dev/psaux"
Option "Protocol" "auto-dev"
Option "CircularScrolling" "1"
Option "Emulate3Buttons" "true"
Option "SHMConfig" "true"
EndSection
in firefox
mousewheel.horizscroll.withnokey.action - Set this to '1'
mousewheel.horizscroll.withnokey.numlines - Set this to '1'
http://wiki.eeeuser.com/howto:touchpad_in_advanced
run 'gsynaptics'
2. Firefox addons:
Download plug-ins for Firefox designed for compact computers and easier navigation. Some names to look for include: "Grab and Drag" and the theme "Tiny Menu."
https://addons.mozilla.org/en-US/firefox/addon/1250
https://addons.mozilla.org/en-US/firefox/addon/1455
3. Use RAMDISK in FireFox (check internet connection)
It turns out that there is a hidden setting in firefox called browser.cache.disk.parent_directory and all you need to do is set it's value to /dev/shm and restart firefox and then you are on your way to speedier surfing. so how do you set this, well it is simple
1) open firefox and type about:config in the address bar
2) accept the terms and click the "i'll be carefull" button
3) right click on any of the values on the screen to bring up the context menu and click new->string
4) the first prompt wants the name of the string enter "browser.cache.disk.parent_directory" without the quotes
5) the next prompt is the value set it to "/dev/shm/" without the quotes
6) restart firefox
7) type about:cache in the browser bar and it should tell you it is using /dev/shm under "Disk Cache Device" if you don't see a "Disk Cache Device" section you did something wrong.
4. Disable LAN and Webcam in the BIOS (Hit F2 upon starting the system) if these are not in use.
5. http://wiki.eeeuser.com/howto:maximize_screen_space
6. *some* of the boot process splash screens can be tweaked straight 'out of the box' via Control Center > Display > Theme > Splash Screen.
7. eee pc restore
http://sourceforge.net/project/showfiles.php?group_id=215613
http://www.glenscott.net/2008/11/12/restore-an-eee-pc-701-back-to-factory-xandros-from-a-usb-stick-with-no-asus-support-dvd/
8. flashplayer 10
http://forum.eeeuser.com/viewtopic.php?id=48308
http://download.macromedia.com/pub/labs/flashplayer10/flashplayer10_install_linux_081108.tar.gz
***********************************************
http://gadgetmix.com/index/?p=4102
http://forum.eeebuntu.org/viewtopic.php?t=294&reeedirected=yes
A lot of us have switched to EEEbuntu on our EEE PCs. If you are like me, who likes to keep his netbook clutter free, you will want to set up RAMdisk. And if you thought that setting up RAMdisk in Windows XP was easy (see this article), then in EEEbuntu, it is even easier.
* RAMdisk is located at “/dev/shm”
* Open firefox and type in about:config in the address bar
* Click on “I’ll be careful”
* make a new string browser.cache.disk.parent_directory
* give it a value /dev/shm
* restart firefox
Usual warning about RAMdisk: you will loose all the data upon restart. That is why, it is only recommended for web browsers
http://www.answerbag.com/articles/How-to-Optimize-an-ASUS-EEE-PC/aee034bf-bbb7-73f7-bb6b-826e0204caa0
http://www.callum-macdonald.com/2007/08/24/circular-scrolling/
For the techies, here’s the relevant section of my xorg.conf (see man synaptics for more info):
Section "ServerLayout"
Identifier "Default Server Layout"
Screen "Default Screen"
InputDevice "Generic Keyboard" "Core Keyboard"
InputDevice "Synaptics Touchpad" "Core Pointer"
EndSection
Section "InputDevice"
Identifier "Synaptics Touchpad"
Driver "synaptics"
Option "SendCoreEvents" "true"
Option "Device" "/dev/input/mice"
Option "Protocol" "auto-dev"
Option "CircularScrolling" "1"
Option "Emulate3Buttons" "true"
Option "SHMConfig" "true"
EndSection
Section "Extensions"
Option "Composite" "Enable"
EndSection
all you need to do is edit your /etc/X11/xorg.conf file
under "Input Device" of your touchpad edit to look like the following:
Section "InputDevice"
Identifier "Synaptics Touchpad"
Driver "synaptics"
Option "SendCoreEvents" "true"
Option "Device" "/dev/psaux"
Option "Protocol" "auto-dev"
Option "CircularScrolling" "1"
Option "Emulate3Buttons" "true"
Option "SHMConfig" "true"
EndSection
in firefox
mousewheel.horizscroll.withnokey.action - Set this to '1'
mousewheel.horizscroll.withnokey.numlines - Set this to '1'
http://wiki.eeeuser.com/howto:touchpad_in_advanced
run 'gsynaptics'
2. Firefox addons:
Download plug-ins for Firefox designed for compact computers and easier navigation. Some names to look for include: "Grab and Drag" and the theme "Tiny Menu."
https://addons.mozilla.org/en-US/firefox/addon/1250
https://addons.mozilla.org/en-US/firefox/addon/1455
3. Use RAMDISK in FireFox (check internet connection)
It turns out that there is a hidden setting in firefox called browser.cache.disk.parent_directory and all you need to do is set it's value to /dev/shm and restart firefox and then you are on your way to speedier surfing. so how do you set this, well it is simple
1) open firefox and type about:config in the address bar
2) accept the terms and click the "i'll be carefull" button
3) right click on any of the values on the screen to bring up the context menu and click new->string
4) the first prompt wants the name of the string enter "browser.cache.disk.parent_directory" without the quotes
5) the next prompt is the value set it to "/dev/shm/" without the quotes
6) restart firefox
7) type about:cache in the browser bar and it should tell you it is using /dev/shm under "Disk Cache Device" if you don't see a "Disk Cache Device" section you did something wrong.
4. Disable LAN and Webcam in the BIOS (Hit F2 upon starting the system) if these are not in use.
5. http://wiki.eeeuser.com/howto:maximize_screen_space
6. *some* of the boot process splash screens can be tweaked straight 'out of the box' via Control Center > Display > Theme > Splash Screen.
7. eee pc restore
http://sourceforge.net/project/showfiles.php?group_id=215613
http://www.glenscott.net/2008/11/12/restore-an-eee-pc-701-back-to-factory-xandros-from-a-usb-stick-with-no-asus-support-dvd/
8. flashplayer 10
http://forum.eeeuser.com/viewtopic.php?id=48308
http://download.macromedia.com/pub/labs/flashplayer10/flashplayer10_install_linux_081108.tar.gz
***********************************************
http://gadgetmix.com/index/?p=4102
http://forum.eeebuntu.org/viewtopic.php?t=294&reeedirected=yes
A lot of us have switched to EEEbuntu on our EEE PCs. If you are like me, who likes to keep his netbook clutter free, you will want to set up RAMdisk. And if you thought that setting up RAMdisk in Windows XP was easy (see this article), then in EEEbuntu, it is even easier.
* RAMdisk is located at “/dev/shm”
* Open firefox and type in about:config in the address bar
* Click on “I’ll be careful”
* make a new string browser.cache.disk.parent_directory
* give it a value /dev/shm
* restart firefox
Usual warning about RAMdisk: you will loose all the data upon restart. That is why, it is only recommended for web browsers
http://www.answerbag.com/articles/How-to-Optimize-an-ASUS-EEE-PC/aee034bf-bbb7-73f7-bb6b-826e0204caa0
http://www.callum-macdonald.com/2007/08/24/circular-scrolling/
For the techies, here’s the relevant section of my xorg.conf (see man synaptics for more info):
Section "ServerLayout"
Identifier "Default Server Layout"
Screen "Default Screen"
InputDevice "Generic Keyboard" "Core Keyboard"
InputDevice "Synaptics Touchpad" "Core Pointer"
EndSection
Section "InputDevice"
Identifier "Synaptics Touchpad"
Driver "synaptics"
Option "SendCoreEvents" "true"
Option "Device" "/dev/input/mice"
Option "Protocol" "auto-dev"
Option "CircularScrolling" "1"
Option "Emulate3Buttons" "true"
Option "SHMConfig" "true"
EndSection
Section "Extensions"
Option "Composite" "Enable"
EndSection
Monday, January 12, 2009
Install a Print to PDF capability
http://timesync.gmu.edu/wordpress/?p=513
Install a Print to PDF capability.
I’m finding this very useful when I want to save a page I find while on the net (e.g., a Google Maps screen) and then have access to it later when I’m not in range of a wireless signal.
* sudo apt-get install cups-pdf
* point your browser to http://localhost:631/
* Add printer
* Doesn’t matter what you type in the next three blanks, hit continue
* On next page, choose “Virtual Printer (PDF)”
* On next page, choose Postscript
* On next page, select Color Postscript option that appears
* Click Add Printer
* Type root and your user password at the authentication prompt
Install a Print to PDF capability.
I’m finding this very useful when I want to save a page I find while on the net (e.g., a Google Maps screen) and then have access to it later when I’m not in range of a wireless signal.
* sudo apt-get install cups-pdf
* point your browser to http://localhost:631/
* Add printer
* Doesn’t matter what you type in the next three blanks, hit continue
* On next page, choose “Virtual Printer (PDF)”
* On next page, choose Postscript
* On next page, select Color Postscript option that appears
* Click Add Printer
* Type root and your user password at the authentication prompt
Subscribe to:
Posts (Atom)